
How to create your own image CDN with Thumbor and AWS

J
Full-Stack developer currently focused on React/Next.js and React Native. Vim enthusiast
Search for a command to run...
Full-Stack developer currently focused on React/Next.js and React Native. Vim enthusiast
Great post! mostly top-notch bloggers recommends AWS as they feel it's fast and secure. I've also written a post about CDN service providers on my blog where I've described what is CDN and why it is important.
Thank you so much Roberto Sumoza!
You're welcome, thanks for reading! 🚀
Thanks a lot Rahul! 🙋🏻♂️
Thanks to you for reading! 🚀👏🏻
Building a developer portfolio can be a difficult task, we have to think of a good design, show our best projects, our last posts blogs, talk about ourselves, offer contact details and then write the code, but as least in my case, this was very compl...

Today I bring you a way to create a highly reusable React component using an advance pattern called Compound. Compound Components pattern The keyword in the pattern’s name is the word Compound, the word compound refers to something that is composed ...

React Iconly - Based on Iconly v2 icons One of the phases in which we invest more time when we are developing or designing a web or mobile application is in choosing the icon pack that best suits the brand and what we want to convey, even creating ...

Image CDNs like Cloudinary or Imgix make it easy to dynamically optimize the aesthetics and performance of your images. Thumbor can help us to do the same but with a difference, is open-source and can be used for free to resize, apply filters, compress, and transform images. It's currently used by Wikipedia and 99Designs.
Note: This tutorial is based on Katie Hempenius article about How to install thumbor but adding AWS EC2 and S3.
This post explains how to install Thumbor on your own server. Once installed, you can use Thumbor as an API to transform your images, we will install on AWS EC2 server and integrate it with AWS S3 to deliver the images as quickly as possible and save the transformations.
This post assumes that you have an AWS account and how to use command-line tools to set up the VM.
First of all, we are going to launch an EC2 VM with Ubuntu 18.04LTS 64-bit (x86), I used t2 micro because it's free tier but you can choose the one that best suits your needs.
Update and upgrade Ubuntu's already-installed packages:
sudo apt-get update -y && sudo apt-get upgrade -y
Now we need to install pip, the package manager for Python. Later you'll install Thumbor with pip.
sudo apt-get install -y python-pip
Install Thumbor's dependencies.
#ssl packages
sudo apt-get install -y libcurl4-openssl-dev libssl-dev
#computer vision packages
sudo apt-get install -y python-opencv libopencv-dev
#image format packages
sudo apt-get install -y libjpeg-dev libpng-dev libwebp-dev webp
sudo pip install thumbor
To see if Thumbor installed correctly this should work:
thumbor --help
Hurrah! 🥳
Now we are going to start the debug server of Thumbor to make some requests and test it.
thumbor --log-level debug
Thumbor is now running.
By default, Thumbor runs on port 8888 However, this probably won't work for you (yet) because cloud providers usually require that you explicitly open firewall ports before they will accept incoming traffic, so we are going to open required ports on our Amazon EC2 instance.
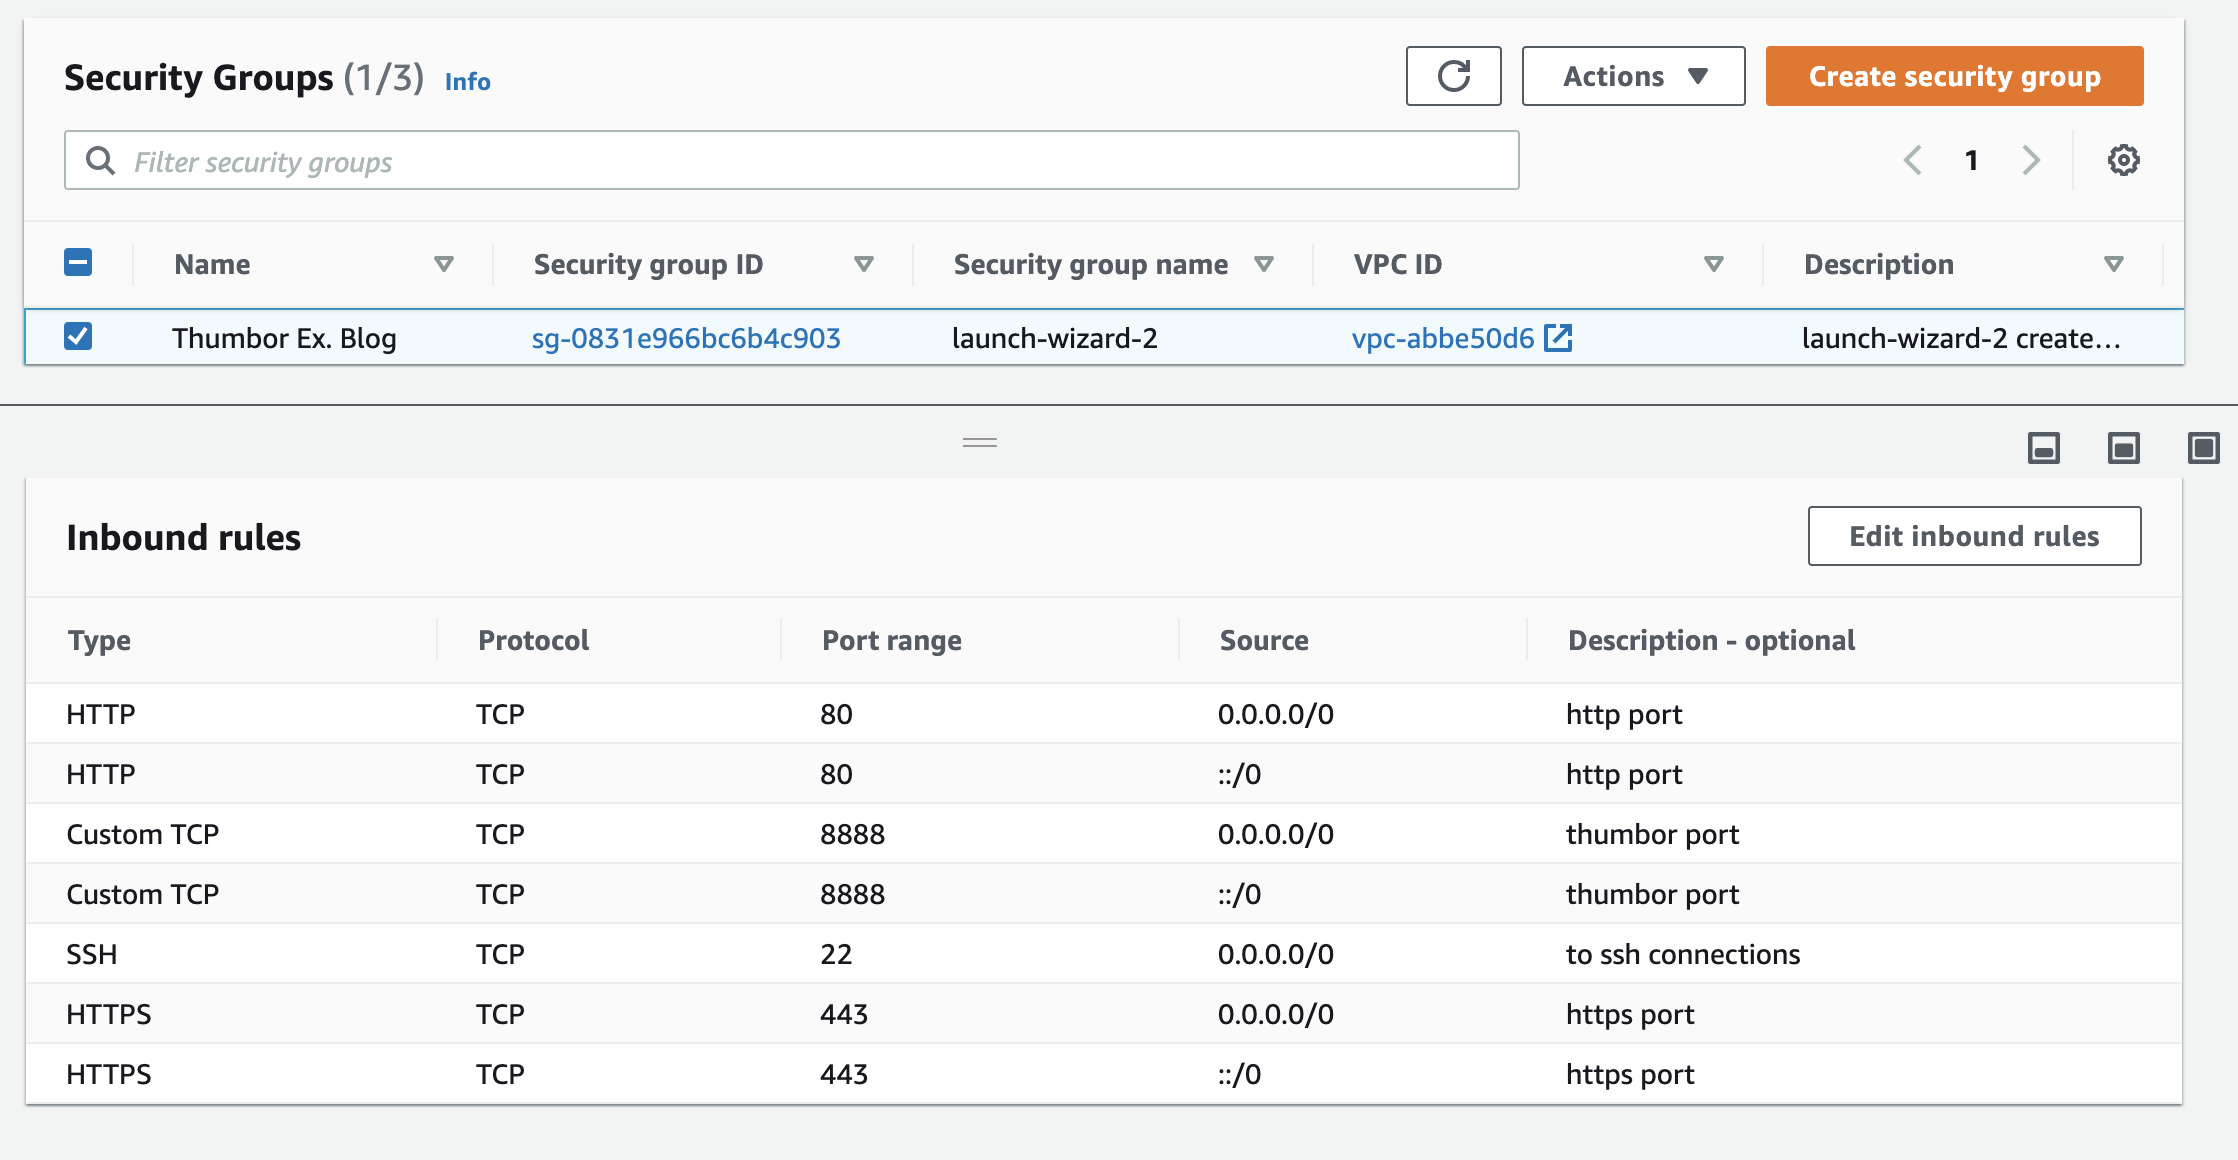
To open the required ports we have to select on the left menu Network & Security -> Security Groups, we select the group assigned to our EC2 instance usually called launch-wizard-1 -> Actions -> Edit Inbound Rules, once there we create the rules defined below and we press Save rules.
| Type | Protocol | Port range | Source | Description |
| HTTP | TCP | 80 | Anywhere | http port |
| Custom TCP | TCP | 8888 | Anywhere | thumbor port |
| SSH | TCP | 22 | Anywhere | to accept ssh connections |
| HTTPS | TCP | 443 | Anywhere | https port |
Once created our security rules, we should see something like this:
Thumbor is now accessible and ready for use 🥳👏🏻. Try it out by visiting the following URL:
http://YOUR_VIRTUAL_MACHINE:8888/unsafe/100x100/https://jrgarciadev.com/avatar.png
You should see an image that is 100 pixels wide by 100 pixels tall. Thumbor has taken the image avatar.png and size specified in the URL string and served the result. You can replace the image in the URL string (i.e., https://jrgarciadev.com/avatar.png) with any other image (e.g., https://your-site.com/kitten.jpg) and Thumbor will resize that image too.
Note: Thumbor uses HTTP by default but can be configured to use HTTPS.
I recommend you visit this article The Optimize images with Thumbor for more information on using the Thumbor API and Thumbor configuration file.
In a production environment, we need to configure Thumbor to start automatically to do this we are going to make use of Linux Systemd.
Navigate to the /lib/systemd/system directory. This directory contains the service files for systemd.
cd /lib/systemd/system
As superuser, create a thumbor. service file.
sudo touch thumbor.service
Using vim or nano add the following configuration to Thumbor service. This configuration will run /usr/local/bin/thumbor (i.e. the Thumbor binary) once networking is available and will restart Thumbor on failure.
I prefer to use vim so the command is the bellow:
sudo vim thumbor.service
[Unit]

Description=Service for Thumbor image CDN

Documentation=https://thumbor.readthedocs.io/en/latest/

After=network.target

[Service]

ExecStart=/usr/local/bin/thumbor

Restart=on-failure

[Install]

WantedBy=multi-user.target
Now we need to start Thumbor, to do this we are going to usesystemctl which is the utility used to manage systemd.
sudo systemctl start thumbor.service
Note: If Thumbor is currently running, you should stop it before attempting to start Thumbor using
systemctl.
Next, "enable" Thumbor. This means that Thumbor will automatically start on boot.
sudo systemctl enable thumbor.service
Verify that you've successfully configured systemd by running the status command.
systemctl status thumbor.service
The status should show that it is enabled and active.
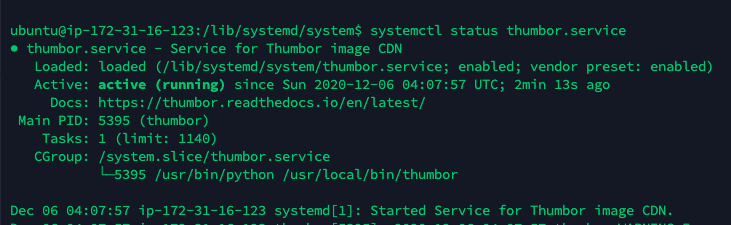
Congratulations 🎊, now you have a Thumbor service running and ready to make transformations, apply filters, resize and convert any image.
We have running our Thumbor service successfully but the aim of this post is to guide you to use Thumbor efficiently, for this reason, we are going to save the transformations in an S3 bucket so we will only do the transformation once if we do the same request again, Thumbor will send us the image that it already has saved in the bucket.
Here we go!
We have to create 2 S3 buckets with all default settings, one for the data source and the other for saving the results, I have named them thumbor-blog-source and thumbor-blog-results.
Once we have created our S3 bucket you have to upload an image on your source S3 bucket only for test, then return the server terminal and we are going to execute the following command to create a new thumbor.conf file:
thumbor-config > ./thumbor.conf
Now we have to install a Boto3 to management the AWS authentication and AWS S3 Plugin just run next commands:
pip install boto3
Once boto3 is installed we need to configure our AWS S3 connection to do this are going to create a file for boto3 configuration:
mkdir .aws && sudo touch .aws/config && sudo touch .aws/credentials
Open the .aws/config file a write the next content:
[default]
region=YOUR_S3_REGION
Save it and open the .aws/credentials file and write:
[default]
aws_access_key_id = YOUR_ACCESS_KEY
aws_secret_access_key = YOUR_SECRET_KEY
Note:
YOUR_S3_REGIONby default isus-east-1orus-east-2
Then we have to install Thumbor AWS
pip install tc_aws
Open your thumbor.conf file created earlier, there are a lot of options but for now, we are going to focus only on the TC_AWS section (This section doesn’t exist in the default config and you’ll need to add it somewhere).
############################## TC_AWS ##########################################
TC_AWS_REGION = 'YOUR_AWS_REGION' # AWS Region

TC_AWS_ENDPOINT = None # Custom S3 endpoint URL (for GCP, Minio, etc.)

TC_AWS_STORAGE_BUCKET = 'YOUR_SOURCE_S3_BUCKET_NAME' # S3 bucket for Storage
TC_AWS_STORAGE_ROOT_PATH = '' # S3 path prefix for Storage bucket

TC_AWS_LOADER_BUCKET = 'YOUR_SOURCE_S3_BUCKET_NAME' #S3 bucket for loader
TC_AWS_LOADER_ROOT_PATH = '' # S3 path prefix for Loader bucket

TC_AWS_RESULT_STORAGE_BUCKET = 'YOUR_RESULT_S3_BUCKET_NAME' # S3 bucket for result Storage
TC_AWS_RESULT_STORAGE_ROOT_PATH = 'thumbor_results' # S3 path prefix for Result storage bucket

# put data into S3 using the Server Side Encryption functionality to
# encrypt data at rest in S3
# https://aws.amazon.com/about-aws/whats-new/2011/10/04/amazon-s3-announces-server-side-encryption-support/
TC_AWS_STORAGE_SSE = False

# put data into S3 with Reduced Redundancy
# https://aws.amazon.com/about-aws/whats-new/2010/05/19/announcing-amazon-s3-reduced-redundancy-storage/
TC_AWS_STORAGE_RRS = False


# Enable HTTP Loader as well?
# This would allow you to load watermarks in over your images dynamically through a URI
# E.g.
# http://your-thumbor.com/unsafe/filters:watermark(http://example.com/watermark.png,0,0,50)/s3_bucket/photo.jpg
TC_AWS_ENABLE_HTTP_LOADER = False

TC_AWS_ALLOWED_BUCKETS = False # List of the allowed bucket to be requested
TC_AWS_STORE_METADATA = False # Store result with metadata (for instance content-type)
################################################################################
Now we have to uncomment and edit these lines on the thumbor.conf file:
## Defaults to: 'thumbor.loaders.http_loader'
LOADER = 'tc_aws.loaders.s3_loader'

## Defaults to: 'thumbor.storages.file_storage'
STORAGE = 'thumbor.storages.no_storage'

## Defaults to: None
RESULT_STORAGE = 'tc_aws.result_storages.s3_storage'
And finally, we have to set as RESULT_STORAGE_STORES_UNSAFE = True option to save thumbor results in our results bucket.
################################ Result Storage ################################

## Indicates whether unsafe requests should also be stored in the Result Storage
## Defaults to: False
RESULT_STORAGE_STORES_UNSAFE = True
Then we need to restart the Thumbor service so that it takes the new settings, write the next command on your server command line:
sudo systemctl restart thumbor.service
Execute the status command to be sure that it's running correctly
Note: If for any reason the server is not running (
sudo systemctl stop thumbor.service) you can stop it and try out with debug mode withthumbor --log-level debug
Now visit the URL of your server with the name of the image saved on the source bucket, in my case thumbor-blog-source
Here a diagram of what we have configured in thumbor :

I'm proud that you made it this far 👏🏻
If you liked it, just let me know and so I will continue with part 2 of this post, where we will delve into the Thumbor options for image optimization, security and we will also install an Nginx server and connect it with CloudFront, an authentic CDN of images! 🚀
Extra: We can see how to mount 4 Thumbor servers managed by an AWS Load Balancer.
Thanks for reading! 🙋🏻♂️